
ASP.NET Core 8 Image Upload & Display (With Database & Folder Options) — 2025 Complete Guide
Uploading images is one of the most common features in modern web applications. Whether you’re building an e-commerce site, admin panel, blog CMS, or profile management system, you need a secure and efficient image upload system.
In this step-by-step ASP.NET Core 8 tutorial, you will learn:
 How to upload an image using IFormFile
- How to save the image in a wwwroot folder
- How to store image bytes in a database
- How to display images back in a page / API response
- How to write clean & secure image upload code
- Best practices for .NET 8 file handling
If you want to secure your API with JWT before adding image upload, check the previous tutorial:
 JWT Authentication in ASP.NET Core 8 (With Refresh Token)
Let’s begin.
 How Image Upload Works in ASP.NET Core 8
ASP.NET Core uses IFormFile to receive files from the client (Postman, form, frontend apps).
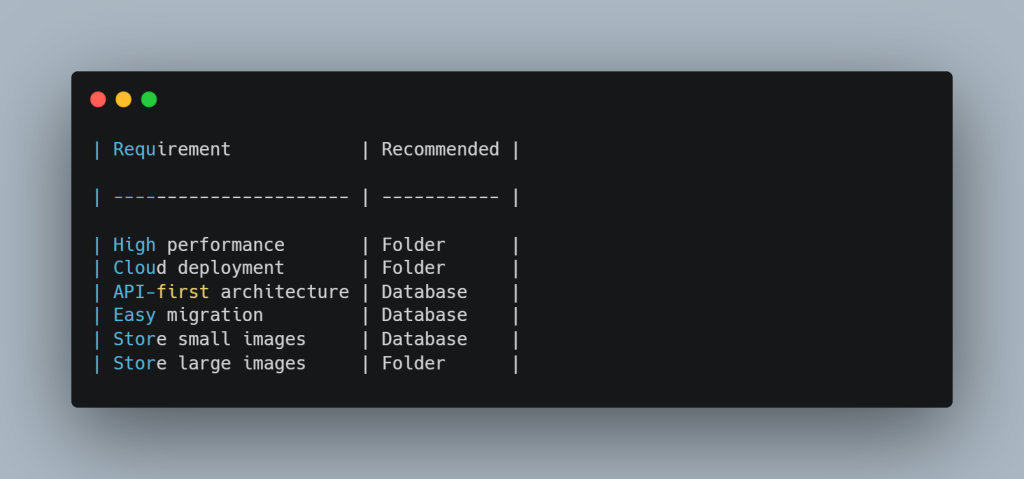
You can save uploaded images in two ways:
 Option 1: Save Image in Folder (Recommended for performance)
Store only filename/path in the database.
Option 2: Save Image in Database (Good for APIs & portability)
Store actual bytes in the DB.
We will implement both methods so you can choose based on your project.
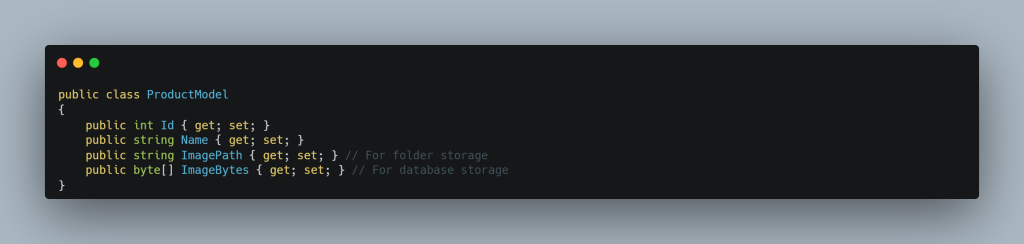
 Step 1: Create Model Class
 Models/ProductModel.cs
 Step 2: Create Folder for Image Uploads
Inside your project:
wwwroot/uploads
If wwwroot is missing → Right-click project → Add → New Folder → Name it wwwroot.
Inside wwwroot → Add folder → uploads
 Step 3: Configure Program.cs for Static Files
In Program.cs:
app.UseStaticFiles();
This allows images inside wwwroot to be accessed via URL.
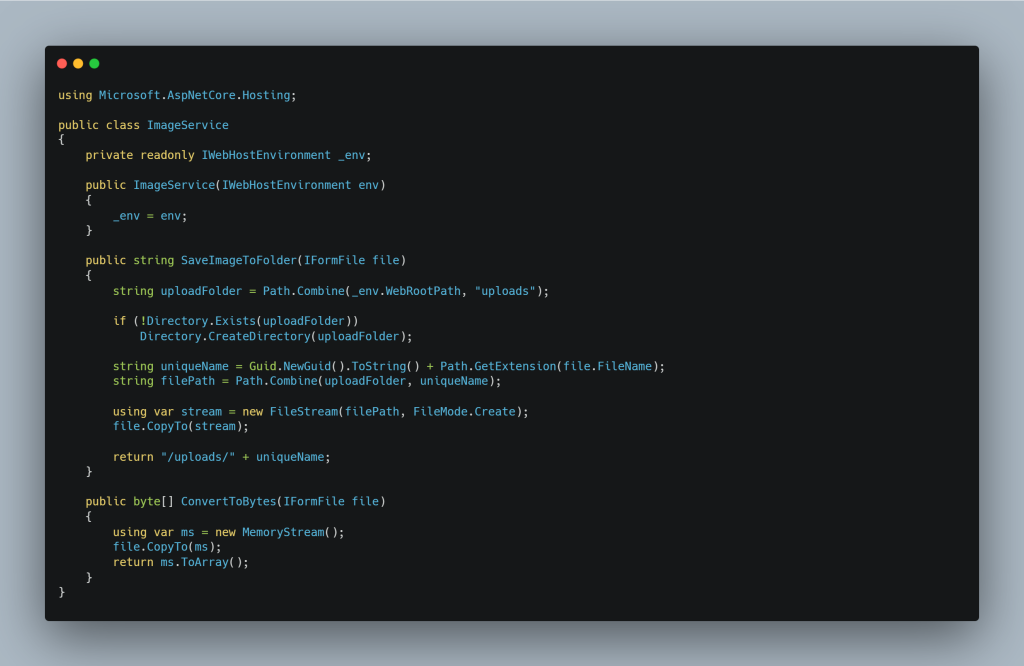
 Step 4: Create Service for Image Upload
Services/ImageService.cs
Register service in Program.cs:
builder.Services.AddScoped();
 Step 5: Create API Controller
Controllers/ProductController.cs

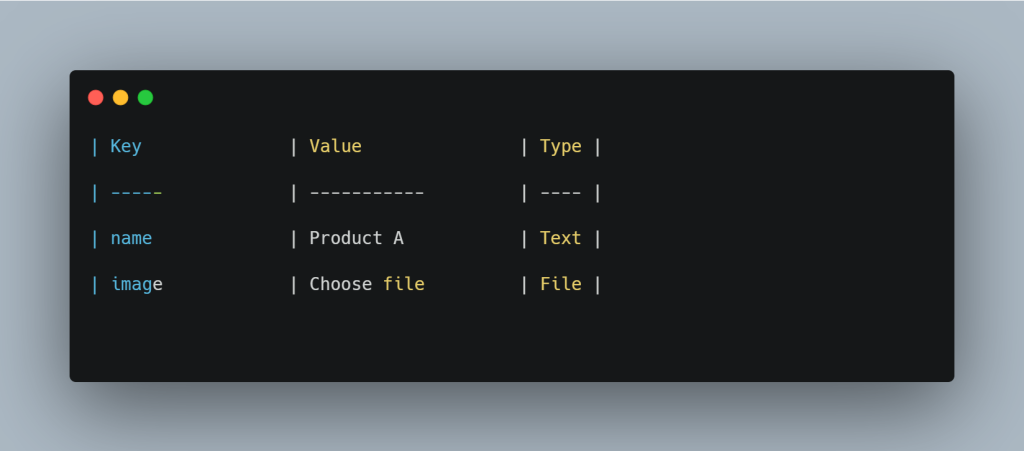
 Step 6: How to Test Image Upload in Postman
 POST →
 api/product/upload-folder
API response:
{
“id”: 1,
“name”: “Product A”,
“imagePath”: “/uploads/5fa9e2a3.png”
}
Then open the image in the browser:
 Display Image in Web App or API Response
If using MVC or Razor:
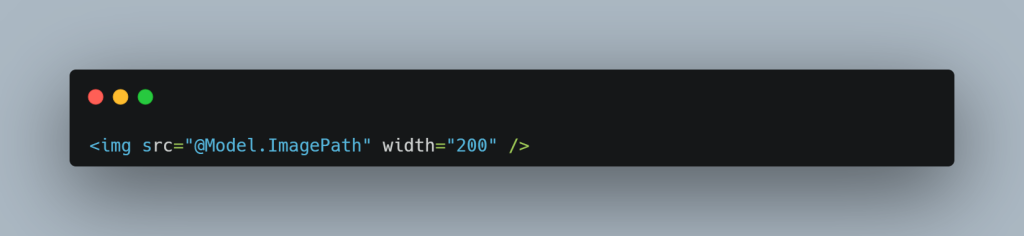
If using React, Angular, Vue:
Just bind the API’s imagePath as the src.
 FAQ — ASP.NET Core 8 Image Upload
1. How do I upload an image in ASP.NET Core 8?
Use IFormFile with a POST API endpoint and save to folder or database.
2. Should I save images in folder or database?
Folder is faster; database is more portable.
3. How can I display uploaded images?
Use the URL returned by API — images served from wwwroot.
4. What size images are supported?
You can configure max file size using RequestSizeLimit.
5. Does ASP.NET Core 8 support static file serving?
Yes, with app.UseStaticFiles() in Program.cs.
outreachseo56@yahoo.com
Hi,
Hope you’re doing well.
I’ll keep this brief. I can place a link to connectedprogrammer.com on 5 genuine local business websites (DR30+), completely f.ree. In return, I’d appreciate links to 5 different of my client sites from your side — a simple, mutual SEO benefit.
If this sounds of interest, I’m happy to share the site list for your review.
Best regards,
Karen
nataliconti2030@gmail.com
Hello,
I was on your website at connectedprogrammer.com and would
like to offer you something:
I’m excited to invite you to something special.
ContentReel26 has just been upgraded with New & Improved AI technology, and it’s changing how creators and businesses produce video content in 2026.
Instead of struggling with scripts, visuals, editing, and posting, ContentReel26 now handles the entire process for you automatically.
<<> : https://bit.ly/businessforall2030
gemmamarshall811@gmail.com
Hi,
We run a hands-on agency that helps clients’ Instagram accounts build authority and reach new audiences. Rather than just “adding numbers,” we focus on tangible benefits:
1. Cheaper than Ads: We deliver targeted eyes on your profile for a fraction of the cost of running Instagram Ads.
2. Real Community: We target users genuinely interested in your niche, leading to higher engagement and potential sales.
3. 100% Account Safety: We don’t use bots. Our team performs every action manually on actual smartphones, keeping your account secure.
4. Consistent Results: Expect 300+ new, high-quality followers every month who actually stick around.
We are currently offering spots starting at just $60/month with no long-term contracts.
I’d be happy to forward you some further information if that would be of interest?
Note: We also work with Youtube Channels.
Kind Regards,
Gemma
https://unsubscribe.social/unsubscribe.php?d=connectedprogrammer.com
blythe.deeds@googlemail.com
Watch this if you are struggling to get targeted leads to your Connectedprogrammer Com website: https://www.youtube.com/shorts/iojvp6ZtjW4
shona.masterson@hotmail.com
Struggling with low website leads for connectedprogrammer.com? This short video shows how our AI can boost your traffic: https://www.youtube.com/shorts/57azYNM9Hq0
ilana@marketing2.cfd
Hi
Tired of spending money on marketing? Lets start 2026 the right way.
1. Find your competitors
2. Receive their clients
3. Make Money
Why do this?
Because of advertising practices of major platforms like Google, Facebook, and YouTube.
It seems quite frustrating that these companies charge advertisers repeatedly for the same leads, especially when they clearly understand the market dynamics.
In contrast, we believe in transparency and fair competition. We provide our clients with access to customer data previously purchased by others, they receive details about leads that would have otherwise cost them thousands.
Plus, we offer daily updates for a month, ensuring they stay informed about their competitive landscape at no extra cost.
Visit us for a free sample!
https://Ilana.marketing2.cfd?domain=connectedprogrammer.com
grubbs.jerrell@outlook.com
Attract the right audience to your site with our AI-driven traffic solution, offering better results than paid ads at a fraction of the price. Get started today.
https://marketingaged.com/
florian.lockyer54@hotmail.com
Attract keyword-targeted visitors from specific locations with our AI-driven solution, a cost-effective alternative to paid advertising. Start now to drive results.
https://marketingaged.com/
avis.beliveau@gmail.com
Boost your Connectedprogrammer Com website’s traffic with AI! Watch this to learn more: https://www.youtube.com/shorts/57azYNM9Hq0
joannariggs278@gmail.com
Hi,
I just visited connectedprogrammer.com and wondered if you’ve ever considered an impactful video to advertise your business? Our videos can generate impressive results on both your website and across social media.
Our prices start from just $195 (USD).
Let me know if you’re interested in seeing samples of our previous work.
Regards,
Joanna
Unsubscribe: https://unsubscribe.video/unsubscribe.php?d=connectedprogrammer.com
warfield.cassie@yahoo.com
Ever stop to think how much you’re spending on marked-up CPMs for Connected TV ads?
If you’re using “premium” audience segments without verifying who you’re actually reaching, that money is likely feeding someone else’s family.
No pressure. Here’s the site if you’re open to see a revolutionary vision for digital advertising
topshelfaudience.com using real-time Intent data from an Integration in our platform to Lotame.com. You can reach me at marketing@mrmarketingres.com or 843-720-7301. And if this isn’t a fit please feel free to email me and I’ll be sure not to reach out again. Thanks!
shuster.abdul22@hotmail.com
Watch this if you are struggling to get targeted leads to your Connectedprogrammer Com website: https://www.youtube.com/shorts/57azYNM9Hq0
wiltshire.maryann@yahoo.com
Attract precise, keyword-driven traffic to your website with our AI-optimized service, costing much less than paid ad platforms. Start growing now.
https://ow.ly/7Iqw50XO1ln
hoyle.sophia@msn.com
Our AI-powered traffic solution delivers engaged visitors to your website, all at a budget-friendly price compared to costly paid ads. Let’s drive results today.
https://marketingaged.com/
galindo.iris@gmail.com
Not getting enough leads for connectedprogrammer.com? Check out this video to see our AI traffic solution in action: https://www.youtube.com/shorts/QFC3wO3eVy0
mattbacak2025@gmail.com
Hi,
I visited your site at connectedprogrammer.com and would
like
to offer you something :
Imagine waking up to find your agency website already built, 100 pre-qualified leads discovered in your area, and outreach campaigns ready to send…
All done while you were sleeping.
No coding. No client-chasing. No proposals to write.
That’s exactly what LocalBizAI did for me.
Just one click… and BOOM!
A fully branded, profit-ready digital marketing agency with services, pricing, leads, and outreach campaigns set up in minutes.
For more click Here : https://jvz6.com/c/688203/424347/
mattbacak2025@gmail.com
Imagine waking up to find your agency website already built, 100 pre-qualified leads discovered in your area, and outreach campaigns ready to send…
All done while you were sleeping.
No coding. No client-chasing. No proposals to write.
That’s exactly what LocalBizAI did for me.
Just one click… and BOOM!
A fully branded, profit-ready digital marketing agency with services, pricing, leads, and outreach campaigns set up in minutes.
For more click Here : https://jvz6.com/c/688203/424347/
erwin.callaway@gmail.com
Discover how our AI can skyrocket your Connectedprogrammer Com website leads in this quick video: https://www.youtube.com/shorts/2tosLZXrvCA
kling.franklyn@gmail.com
Drive targeted traffic to your site with our affordable AI-powered solution, saving you big compared to pricey paid ad campaigns. Contact us to learn more.
https://ow.ly/mtUs50XSIJZ
torsten.vesely@yahoo.com
Boost your Connectedprogrammer Com website’s traffic with AI! Watch this to learn more: https://www.youtube.com/shorts/2tosLZXrvCA
sells.jayme89@gmail.com
Our AI-powered solution sends precise visitors to your site, costing significantly less than expensive paid ads. Learn how to increase your reach today.
https://marketingaged.com/
alba.nichole@gmail.com
Why pay high costs for paid ads? Our AI-powered traffic service delivers engaged visitors to your site at a much lower price.
https://marketingaged.com/
ojjames2023@gmail.com
Hi there,
I hope this message finds you well and thriving! I’m thrilled to share some exciting news that will redefine how you approach local marketing. Introducing Local Directory Fortune – City Stars, the ultimate solution for building and managing a professional local directory effortlessly.
We all know the challenges of standing out in the crowded local business space, but this is more than just another tool – it’s your opportunity to become the go-to resource for businesses and customers in your community.
For more click Here : https://warriorplus.com/o2/a/k7q70t6/0
grady.horrocks@gmail.com
Our AI-optimized service delivers keyword-specific visitors to your site, offering better results than paid ads at a fraction of the price. Contact us to start.
https://ow.ly/JKzl50XSII5
kristi.trower@hotmail.com
Not getting enough leads for Connectedprogrammer Com? Check out this video to see our AI traffic solution in action: https://www.youtube.com/shorts/hpe1Ti9BI2c
liliana.pillinger@gmail.com
Boost your website traffic with our AI-powered service, delivering targeted visitors at a lower cost than paid ad campaigns. Get in touch today.
https://marketingager.com/
james.smart13@outlook.com
Drive keyword and location-targeted traffic to your website with our AI-powered service, costing much less than paid ads. Contact us to start growing your audience.
https://marketingager.com/
🤤💦 Available BTC. Next - yandex.com/poll/WRVjqbSX2yscgTuFhiPPi5?hs=884e6a726fb0cb83e7be90195e9b8c09& 🤤💦
x4rw8r
cambell.shelli71@gmail.com
Boost your connectedprogrammer.com website’s traffic with AI! Watch this to learn more: https://www.youtube.com/shorts/A-OuNefvXeA
pearl.foley55@outlook.com
Our AI-optimized service sends high-intent, keyword-targeted visitors to your site, saving you money compared to paid ad campaigns. Ready to get started?
https://marketingager.com/
Anya158Sl
Hello friends!
I came across a 158 valuable tool that I think you should browse.
This tool is packed with a lot of useful information that you might find insightful.
It has everything you could possibly need, so be sure to give it a visit!
https://newyorkspaces.com/tips-to-give-an-amazing-decor-to-your-childs-bedroom/
Furthermore do not neglect, everyone, — one always can within this publication discover solutions for your the very complicated inquiries. Our team made an effort to explain all of the data via an very accessible method.
justus.glenn@gmail.com
Not getting enough leads for Connectedprogrammer Com? Check out this video to see our AI traffic solution in action: https://www.youtube.com/shorts/A-OuNefvXeA
anderson.scutt@yahoo.com
Why pay high prices for paid ads? Our AI-powered solution drives targeted traffic to your website at a much lower cost.
https://ow.ly/f9zB50XSIGy
bold.myrtis91@gmail.com
Discover how our AI can skyrocket your connectedprogrammer.com website leads in this quick video: https://www.youtube.com/shorts/m26AoaWSFII
hildegard.titheradge@hotmail.com
Our AI-optimized service delivers keyword-specific visitors to your site, offering better results than paid ads at a fraction of the price. Contact us to start.
https://cutt.ly/ttQitlnc
zimpel.ute@hotmail.com
Save on marketing with our AI-optimized service, delivering keyword and location-targeted traffic for less than paid ad campaigns. Start scaling your website now.
https://cutt.ly/7tQitrMN
whetsel.danelle44@gmail.com
Boost your Connectedprogrammer Com website’s traffic with AI! Watch this to learn more: https://www.youtube.com/shorts/d7kGxfGVyNg
kaley.garvan@outlook.com
Drive targeted traffic to your website with our AI-powered solution, saving you money compared to expensive paid ad platforms. Learn more today.
https://cutt.ly/EtQitYXz
katherine.beauchamp97@googlemail.com
Our AI-powered solution drives location-specific visitors to your site, delivering better results than paid ads at a lower cost. Reach out to learn more.
https://ow.ly/KJL650XSItJ
ojjames2023@gmail.com
Most people don’t fail online because they lack opportunity.
They fail because the thinking overwhelms them.
What should I build?
How do I structure it?
What comes next?
That mental weight is what kills momentum.
ClawMate was built to remove that layer completely.
It’s not another chatbot waiting for prompts.
Click here for more : https://jvz4.com/c/688203/433889/
woodson.forest@gmail.com
What if connectedprogrammer.com could tap into TikTok for genuine leads? Our smart AI growth service targets the right users—based on hashtags they use and people they watch—to boost your reach and push traffic back to you. We’ve had websites like yours see over 100 leads monthly.
Want to make TikTok work for connectedprogrammer.com? Watch this short video for more info: https://www.youtube.com/shorts/sfVup2NhPQ4
bainton.darby10@gmail.com
Need more clicks and conversions for connectedprogrammer.com? Watch this short video about our AI-powered traffic service: https://www.youtube.com/shorts/m26AoaWSFII
helene.creswell@hotmail.com
Boost your Connectedprogrammer Com website’s traffic with AI! Watch this to learn more: https://www.youtube.com/shorts/d7kGxfGVyNg
jarrod.gunter1@hotmail.com
Unlock more targeted leads with our AI! Watch this short video to get started: https://www.youtube.com/shorts/iojvp6ZtjW4
spillman.sommer@gmail.com
Imagine if connectedprogrammer.com could leverage TikTok for authentic leads? Our smart AI growth service zeros in on the right users—based on hashtags they’re into and accounts they follow—to skyrocket your reach and drive traffic back to you. We’ve had businesses like connectedprogrammer.com see over 100 leads monthly.
Want to make TikTok work for connectedprogrammer.com? Watch this short video for more info: https://www.youtube.com/shorts/sfVup2NhPQ4
willian.grizzard@gmail.com
Save big with our AI-powered traffic service, sending keyword-targeted visitors from specific locations to your website for less than paid ad campaigns. Learn more today.
https://ow.ly/JKzl50XSII5
ojjames2023@gmail.com
Hello,
I found your website while browsing in your niche.
Many website owners are using this SEO tool to find keywords and analyze competitors.
You can try it here:
https://bit.ly/4bpajr8
It may help improve your search traffic.
Best regards